Splatoon Weapon and Stage Overview/Reviews

Welp, I finally decided to do this. I had this planned for some time, and I needed the right time to start it. And then I realized school is coming so I'm just gonna yolo it and do it now. Anyways, I'll covering every weapon and stage, the good, the bad, the quirky, how it is in each mode(I'm not waiting for Rainmaker lol) and what I like at dislike about, and maybe even some tips. This won't be on a schedule, since I won't always have the time. I'll start with the stages and I will be doing the first one, infact, the first version of that stage tomorrow .
 
URCHIN UNDERPASS 1.0 ​

latest
Now, I know the stage has been updated, but it's old form is still there in single player! I've played on this form plenty of times, so I still have memory of it. This stage was pretty basic, a base, 2 flanks, and a main area. But after a while, this stage will get you salty, in each and every mode. Snipers on the perch to the side had too much control, and when the middle was claimed, your team, is left behind a choke which if your team is incompetent, will be trapped behind it. Splat Zones is pretty great on this map, besides the annoying snipers, and Tower Control is fine until you reach the enemy base,which chaos ensues there. There isn't much to say about both versions, but the second version has many improvements, which I will be noting on next time. 
 
Urchin Underpass 2.0​

It's bigger, better, and stronger too. Really like this version. There's many improvements on this stage that make it much more interesting than the first one. First of all, the path leading to the center has been wided with platforms to get thet higher ground. The side paths are a lot more unoticable, so enemies can't really seek and lock you into the base or catch you while the zone is being fought over. The center is widened and also much more space.

This map is great in just about every mode. The only dislike I have is why move the trees to the center.Yes, the cover is great, but it just seems....off. Anyways, all-in-all this map is pretty great and does right what the first version lacked.
 
Walleye Warehouse​

The most basic, and close to being the Final Destination/Battlefield of Splatoon, it's Walleye Warehouse! This stage is good for starters, and pros, so it's pretty all-around.

Here's what I like. This stage is great for any mode, period. There's three main areas. There's two sections at the base, and then the center where all the fighting happens. There's two flanks, which pretty average. What I like to do is stay back and cover turf, but sometimes I love to rush ahead and defend the base form inkvasion. For Turf war there's the basics: crates for Snipers, and low ground for Shooters and Rollers. In Splat Zones, the zone is divided, so you must be quick to kill. It's pretty easy to flank, and the sides are good areas for Squid Beakons. Again, pretty all-around. Tower Control and Rainmaker can get pretty hectic, as always. It's easy to stay back with the Rainmaker to allow your team to make a safe path, and Tower Control is ok since the ground pretty leveled to allow either team to push. BTW, the right enemy flank becomes available to pass through on Tower Control and Rainmaker, allowing for more pathways. But I only suggest using it for Tower Control, since it's pretty cramped for Rainmaker.

Now for the cons. The stage is pretty basic so it can get a bit mundane in the last 30 or so seconds. Also if you have a team full of pros, it's not difficult to spawn-camp, since there is no unreachable ground that the opposing team can get on.

Overall, good stage, and it was a great pick for the first to Testfires, since it's beginner-friendly. I would suggest playing on this map first when getting the game, but try other stages to further advance your skills and, well, not get bored.
 
Saltspray Rig​


Oooh, here's one of my favorites! Here's the breakdown. There's spawn points across from each other rather than facing each other, an area near the base, one center area, a chunk of area down at the bottom, and a huge piece of land north of the center that spells: Fresh Turf.

What I like about the map is how it there's always a way to sneak around. Annoying charger? Get 'em from behind or swim up the pipes from the center to jump up, and whack them with a roller! Gunner below? Jump from the high ground. There's inkable pipes on each side of the elevators which you can swim up to suprise a unsuspecting Inkling, crates stacked high at the huge northern portion that can be used to hide or get the high ground. I really like the huge zones seperated concept in Turf War. Splat Zones is pretty average, focusing on the center.

However, the Rainmaker and Tower Control modes can get very hectic and crowded, since they do not use the upper part of the stage, which would of made it a lot more exciting. They probably should have blocked off the top area in Rainmaker, but then again, you can still retreat into base. But it can get easily captured and defended by a good team in Turf War and will most likely never be taken back. The crane carrying a little grate platform is useful for sprinklers and beakons, but other than that it could've been made to have more purposes.

Again, this is another stage that is great for all skill levels, with a subtle gimmick and pretty good terrain. Agree? Disagree? Let ke know what you thought! Next up, Blackbelly Skate Park!
 
Blackbelly Skatepark
latest
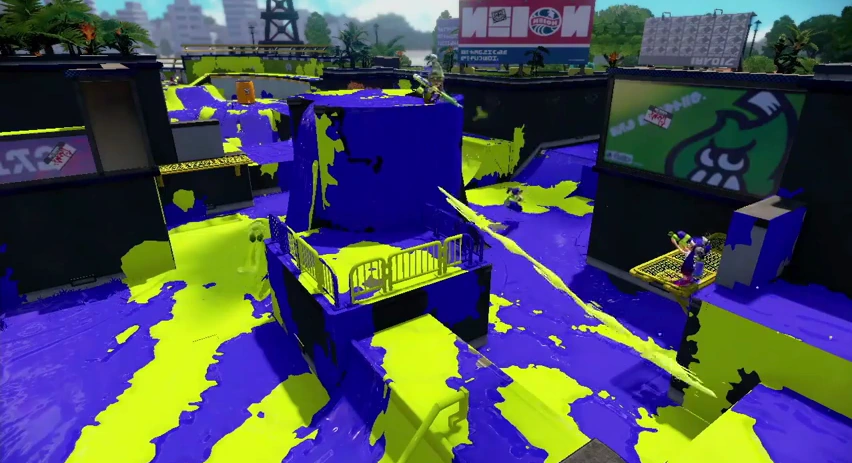
I actually liked this stage at one point, but I think what happened is that I got really tired of it, as it felt like it was getting worse every time. The stage itself is pretty compact, with ramps and wide areas and a center tower.

The center tower is pretty alright for snipers, but it's pretty easy to get hit and killed and it's actually not that easy to get snipes from up there. The middle portion is good for rollers, but the ramps near base are utterly hard to roll on.The shooters are pretty alright here, actually just make sure you have enough range.

What can be really annoying about this map is whereryou're all up in enemy territory , only to look at your map to see your base being taken up. The battle occurs just about everywhere on the map, so you better have a good team that can take care of the rest of the map. Rainmaker's very short here, the goal is not very far from the Rainmaker, and it can also get very crowded, since the map is pretty small. Tower Control is mediocre, it gets crowded, but the tower isn't exactly sanic fast, so it's ok. Splat Zones is probs the only good ranked mode(this is byist cuz I love Splat Zones lol)

Pretty much, this stage is okaaaaaaaaaaaaaaaaaaay.
 
Arrowana Mall​

The concept, if anything, I'd say this stage is a slightly worse than Blackbelly. But this stage is actually pretty fun despite so many flaws.

There's not many paths, and the stage is pretty skinny. It's not exactly bad, but it can be boring. Every mode has that raised platform in the middle which is insanely hard to to capture and recover. I feel like that there's too much attraction to the center. Well, being crowded is the "gimmick" of this stage. One thing I find is actually good about the middle is that no one's sneaking off  into enemy base, which makes up for the lack of area to get there. The raised perches on the sides are good, but I would like to see a little more. The square base are seems different, and not entirely in a good or bad way. I'd really wish they didn't add all these ramps though. If you manage to capture the zone in Splat Zones, it's mostly likely an easy win since there aren't many flanks, Tower control makes good use of the perches in order to get back the tower, and Rainmaker, while fun can get all too crowded in the side corridors.
Okay design, overall fun, but could use some improvements.


Next up: The Splattershots! For these weapons' I'm gonna try and use a rating system and see if I like it. If I do, I'll probably use it more.
 
Splattershot Jr.
What a great weapon to introduce to the player. The design isn't all that much, but the fire rate and coverage is great. The range is a little more that that of the Aerospray, and the Splat Bomb can increase the kill range. Bubbler is good for when you're in a tight situation or you're trying to push. Good call for a starting weapon, Nintendo. 8.8/10
Custom Splattershot Jr.
This one is an odd ball. It has all the perks of the original Splattershot Jr., however the sub and special are something else. Disruptors are good subs that limit your opponent's options, but they're not exactly offensive. Say a teamate and an opponent were facing each other. A Splat Bomb to the foot would be a much more viable option. Still a good tool to use when hunting someone down. Echolocator is more of a supportive special here unless you want to be very aggressive. Tricky weapon, but if used the right way can be good. 7.4/10
Splattershot
Good spread, good fire rate, range, and damage. A great main. Burst Bombs are quite the unusual fit, though becuase the Splattershot does not lack in power or range. Still has it's uses. Burst Bomb Rush is ok to push enemies back, but lacks in power and coverage. 8.2/10
Tentatek Splattershot
Hoo baby, this one! Very mobile with all the great things about the original. Combine that with Suction Bombs that apply to many situations and a Inkzooka that can take out far enemies in a cinch, and you got a weapon that's pretty much perfect. The only weaknesses that I see are that it can be outranged. 9.8/10
Splattershot Pro
Decent weapon. Enhanced range, and requires high accuracy, which fits the Pro name. The Splat Bomb is kinda redundant because of the range, but good for kills. Inkstrike is alright for covering turf. 7.6/10
Forge Splattershot Pro
The tweaks on the sub and special add a little more sparkle to the weapon. The Point Sensor helps with hunting down, and the Inkzooka improves the kill range. Slightly better. 7.9/10
 
Splat Charger
The Splat Charger is all-around charger that can be used in any mode and does a great job of being your typical charger. The charge is fast, and the range is neither overwhelming or underwhelming. Easy to pick off opponents with, and the bomb helps when being attacked up close. Bomb rush is an excellent fit for any mode, it covers turf, and will destroy any enemy blocking the Tower, Rainmaker, or even camping in the zone. One disadvantage is that it's hard to find a specific range to snipe from. You wnat to find a safe distance, but at the same time stay near the team to assist with your bombs. You will have to be on a team which has a lot of turf covered already so you can move from sniping post to sniping post. 8.7/10

Kelp Splat Charger
The playstyle and attributes of the Kelp Splat Charger are near identical to those of the Splat Charger. The sprinker helps out a great deal by being able to lay turf for you to charge the Killer Wail and act as good bait. This makes it so you don't have to move around to often. The Killer Wail allows you to assist your team on key choke points. This weapon plays less aggressively, which helps less in modes where you're always moving like Rainmaker and Tower Control, but execls in Splat Zones and Turf War. 7.7/10
 
FORGET PORT MACKEREL, WE GOIN' TO THE ART MUSEUM BOYS!

Museum D'Alfonsino
​
Five rotating platforms. Wide areas. Art everywhere. This map has it all. Here's the breakdown. As I mentioned, there's spinning platforms from spawn to spawn. Two overlooking the center which has it's own spinning platform. There are wide areas around them, at different heights.

Turf(and in general): The wide areas are fun for inking, there's enough flanks to get around, and the spinning platforms allow more dynamic gameplay. The centerpiece platform will test your timing in order to reach enemy base. This is the only way to get to enemy base, so you should be fine from being spawn camped for the most part. The two tall spinning platforms are great to get some height, but it foating can get in your way, so Chargers don't dominate as much. The left flank is pretty much useless, here, and in Ranked. Don't expect it to save you in the last 30 seconds. The rtwo right paths are quick ways allowing you to get to the center fast, this comes in handy in the other modes. As for the weapon diversity, this map has something for every type of weapon. 9/10

Ranked:

Splat Zones- Crowded. The zone is tiny compared to what you'd expect. The center spinning platform can make inking the zone tough at times. It's not easy going in with a Tentatek or Roller(barring dynamos), so weapons with a bit of range will fare well. Although, if you happen to die in the chaos in the zone, the spawn is put closer to the center in order to let you get right back in the action. The two right paths can help you a lot, but expect to be attacked. Many areas, if occupied by the enemy could be hard to take back. 7/10
Tower Control- I really like Tower here. Fighting for the tower is a bit easier here, take a few enemies out, you're good to go. The wide area around it helps, so you won't get splatted early. Being the one on the tower isn't as bad, the giant spinning platform you go by can protect you and your team, a.d you can help take out enemies. Like in the Splat Zones, the spawn is closer to the action. The only con is if your team is on the losing side of the stick. 8.5/10
Rainmaker- A mix of both. It starts out a little crowded, but the wide areas help you get around and aviod attacks. Bringing the Rainmaker, the right path is the way to go because of the protection the spinning plaforms gives. The left is faster, but is potentially dangerous. This is easier for last-minute pushes though. Getting closer to the podium, there is another two paths to take. The left is much easier this time, it is much harder to reach for the enemy team. The right has you going closer to the enemy spawn, which is dangerous. If you're the one trying to stop the rainmaker, be diligent, if you let the rainmaker get up their left path, it's game over. Action-packed, and extremely fun, if you're smart. 9/10

Tell me what you thought of this! I changed the format a little, I think it's a bit easier to express my opinions. If I need any improvements do speak!

 
.52 Gal
The .52 Gal incorporates power and defense, a weapon great for team support. It splays in 2 hits, with a range similar to the Splattershot, only with a slightly slower fire rate and walk speed. The sub is a Splash Wall, which sheilds you and your teamates,l and can come in handy in sticky situations. The Killer Wail assists in defending areas and securing choke points. In Turf War, you can cover serious ground, while being able to defend it with your power and mobility. In Splat Zones, the Splash Wall and Killer Wail help you in defending the zone. The Killer Wail can also eliminate enemies in the zone or run them out. Tower Control is where weapon shines the most. Support the tower with Splash Walls and the Killer Wail, and the .52 Gal's power can quickly take out foes near the tower. However, in Rainmaker Splash Walls won't be much of a help, since Inklings are constantly moving in this mode. The power can get some quick kills, and the Killer Wail, while not the most effective here, still sort of works. A freat weapon to have on your team. 8.3/10
.52 Gal Deco
Along with the original, the Deco has the ability to support the team. Seekers, expand kill range, and can be used in many situations. It also comes with an Inkstrike, too. The Deco holds really well in Splat Zones and Rainmaker. Seekers can help take back a zone, and defend it from afar. And if that's not enough, you have an Inkstrike ready to launch at the zone so you can take it back and win the match. In Rainmaker, the Deco's Seekers have many purposes, too. You can easily splat the Rainmaker holder, and and anyone surrounding the Rainmaker. Want to break the Rainmaker Shield? Need a tool to help push? The Inkstrike is there. Bundled with the original's 2 hit splat, this weapon packs a real punch. 8.8/10
 
Slosher
A weapon just about anyone can use. The package comes with handay dandy burst bombs and an Inkstrike. This thing covers turf goooood, and can even go over walls with it's decent range (this means you'll get outranged, sorry). You'll strike opponents from above, with the same damage output (which is a another 2-hit KO btw), so you never expect less. Burst bombs are one of the best tools for up close combat, which fills in the weakness it has and even packs a deadly combo! However, if you use Burst Bombs, keep track of your ink tank, it'll enlty soon enough. Inkstrike is a basic special, not the very best one, but it can get a key point secured, so it isn't bad either. The recommended modes would be Turf War, Splat Zones, and maybe Rainmaker. Tower Control is okay, just don't go in thinking you'll carry. You won't. 9.0/10
Slosher Deco
I'll touch only on the sibs and specials, to see about the main weapon read the first part of the orir Slosher review (as if you didn't know). Huh? This has a Splash Wall, meaning, team support, and cover! One thing that deters the deco however, is the fact that Splash Wall won't do you good in close range combat, and if you do try and use it, you'll be too caught up and lose all your ink. But now with Panic Kraken™(from the creators of Panic Bubbler™), wipe away foes easy as dumping a bucket. I'd recommend this on every mode, just play a bit safer, don't wanna get splatted without your Panic Kraken™. With the small flaws of the Splash Wall (and maybe the kraken nerfs), this weapon would be very close to the vanilla in terms of score. Like I said though, this plays slightly different. 9.0/10
 
Dual Squelcher
Need a weapon that can out range a Tentatek or N-Zap, but don't want the slow fire rate of a .96 Gal or Jet Squelcher? Go with the Dual Squelcher! This thing is for an Inkling who needs to take a step back. It has a fast fire rate good for turf claiming, but hold on- it has weak 5-hit KO, so strap on some Damage Ups and get a good aim on your opponent. Another weakness is that it will eat up your ink tank. Splat Bombs, good for simple kill, but yeah, it also eats your ink. However, Echolocator is there to fill it up- and give you and the team intel on enemy whereabouts. You'd want to go on the front lines, but this does crap in close-up situations like the other ranged weapons. It's hard to see how it does in all the modes besides Turf. Just try and work around the flaws, and you got a decent, not the best or outstanding, but decent weapon. 7.0/10
Custom Dual Squelcher
Main weapon quirks, up there ^. Well, this one's kinda worse, sorry to disappoint. Beakons and the Killer Wail have their uses, I'll talk about them later, but they don't do anything to cover the bad points of the main weapon. Beakons serve support for the team, bt again, nothing to help yourself in battle. The Killer Wail can be for clearing areas in certain modes, but is sort of a crappy special considering we don't have the best main and sub combo. Recommended Modes: Splat Zones(eh) Tower Control, Rainmaker(little more ehhh) (also wow I thought every weapon was great for turf).You really just have to make the best use of the main and hope for teh best. 6.6/10

Let me know if you disagree or agree! Also by the way, mention what stage you want next, I don't feel like know which would be best to choose, since I've decided to go out of order.
 
Port Mackerel​

For the first map being released after the game was, after playing it for a few weeks, it wasn't too good in my opinion. It's a grid-like map and that's where the problem start to stem from.

General/Turf War: Like I mentioned it's a map with many straight pathways. Starting from spawn you have 2 side paths that bring you to a large rectangular area. There's two other paths, more straightforward with short passages that let you go between both paths. The things I mentioned are also what the enemy's base looks like so you'll see the same thing when you approach their spawn. There's a middle with 3 by 3 blocks after you pass the wide rectangular area. With Turf War and all the modes, makes sure the enemy doesn't get past the middle. That can lead to easily being spawn camped unless you have someone watching. And because the map has no wide middle and more flanks, it's hard to get out of being camped without being splatted. So when starting make sure to either go ahead and stop and enemy advancements or stay back to cover ground and watch for any enemies who get too far. By the way, Turf War in the Port only also features vehicles that you can swim up and gain height. 5/10

Ranked:

Splat Zones- The issues with the map in Turf War also become recognizable in Splat Zones(this is a double zone map, btw). Keep more of your team back at first, then advance. If your team is easily wiped out, the enemy will have full control. Although if not, the match can be pretty equal. 6/10
Tower Control- The lanes are put to better use here. Easily sneak behind the tower or approach from the side. Bringing the Tower to its goal can be tough, but that's the way it's always been. 7/10
Rainmaker- Kinda like Tower, the lanes can help you move around as the rainmaker an sneak around foes. You can reach side flanks here easier, too. The only problem with the lanes is that once the rainmaker is near the podium, it can get extremely rough for both sides packed in two lanes. 7/10
 
Heavy Splatling
The first of it's kind the Heavy Splatling! This weapon lets you charge and shoot multiple shots of ink on the battlefield. It has a fairly quick charge, lasts a good amount of time, a range that can be exploited to add for more kills, and kills in 4 to 6 hits(depending on the amount of Def Ups). Its Splat Wall and Inkstrike both help in claiming and hold a key area. However, it is a slow weapon without anything but a Splash Wall to protect yourself, so being rushed is a weakness. This weapon is in its prime when you're playing Turf War or Splat Zones, as it can cover a significant amount of area and push opponents away, have you found a perch or safe area. The Heavy Splatling can pop the Rainmaker bubble quickly, and this weapon is good for taking out a group of Inklings surrounding the Rainmaker holder. Not to mention the support the Splash Wall and Inkstrike give. This weapon can take out any surrounding the tower in Tower Control, or launch an Inkstrike on the it, but the tower can get get in the way, and it's not the best to use when you're on the tower yourself.7.2/10
Heavy Splatling Deco
Main weapon quirks, again, up there ^. The Deco is a well-balanced improvement. First-off the sub, the Point Sensor. Good for use in any mode, it can locate that one fast Blaster, or add pressure. It's good for knowledge and team supportk but lacks in close-combat. And that why there's the Kraken. Handy when you're being ambushed, a press of the R stick and you'll turn the tables. Beware if they bait you too far, or you'll be dead squid once you revert back. Like the original, it preforms swimmingly in Turf and Zones with it's ability to hold it's own ground or rush in with the Kraken. In Rainmaker, it's very useful in tracking the Rainmaker with the Pont Sensor and splating the holder with the  mighty Kraken. In Tower, it has some improvements, being you can track and take out those near the tower, or hop on and rid of any opponents with the Kraken.7.6/10
 
Back
Top